Produced by Atlassian, Jira is a world-class project management software that facilitates documenting and tracking requirements, managing work, and reporting progress for both traditional and agile teams.
Combined with Tempo’s Roadmunk application, Jira’s roadmap feature provides team members and management unparalleled project visibility, providing context to tasks, timelines, and goals.
While Jira’s road-mapping feature is intuitive, investing time to work on the Jira roadmap tutorial and learn some best practices can set you up for success and ensure you get the most out of your roadmaps.
What’s a roadmap?
A roadmap is a tool that visually represents project work, from initiation to execution to closure. This map helps project managers provide teams, external stakeholders, and executives a high-level project view that communicates task timelines and necessary resources.
With Jira, planning transitions from the theoretical to the concrete, since you can easily create a visual representation of tasks, timelines, and dependencies. This birds-eye view helps teams notice roadblocks, mitigating them before they impact delivery deadlines.
And a Jira roadmap view is customizable, allowing you to configure the information to your audience. Whether team members, clients, or upper management, each group receives the right amount of data with the option to learn more in a single click.
For teams operating under the Lean agile framework, project roadmaps provide context for a scrum’s work, allowing them to prioritize features and products that address customers’ ongoing needs. And thanks to the high-level view, teams can focus on deliverables that meet agile’s requirement of continuous value delivery.
Types of roadmaps in Jira
Jira roadmaps are highly flexible, allowing you to customize the data to a specific audience. Here are a few of the most common audiences:
- Upper management: Create a roadmap that outlines a company’s organizational strategy and goals or define a project in alignment with business objectives.
- Engineers: Roadmaps designed for engineering teams define the scope of an engineering project, including release information, features, and requirements.
- Marketers: By defining a roadmap, marketing teams can understand what features entice customers to purchase. A Jira product roadmap outlines strategy and goals, plus the benefits of each release.
- External stakeholders: A roadmap is an essential communication tool, providing key stakeholders with clear, concise information regarding new product releases and critical timelines without overwhelming them with unnecessary details.
Why use a Jira roadmap?
Jira roadmaps visualize a team’s strategic vision, defining the “how” and — perhaps more importantly — the “why” of work. It connects what’s happening at the project level to the organization’s broader objectives and customer needs.
This visibility makes it easy for the product owner to adjust strategies and task priorities based on user feedback, providing visibility and justification for the changes. And this information is easily accessible to team members and external stakeholders, not only illustrating changes in direction or task hierarchy but also clarifying processes and communicating deadlines. With Jira, timelines and milestones automatically update whenever a roadmap shifts, saving time and ensuring you haven’t forgotten to adjust a critical deadline.
Jira roadmap software is a comprehensive communication tool. No matter your audience, you can tailor the information to guarantee your message gets through loud and clear.
Best practices when creating roadmaps in Jira
Creating a usable roadmap in Jira is both a skill and an art. And following some simple best practices can help you craft a clear workflow visualization for project plans, backlog sprints, or big-picture goals:
- Include data that’s useful and relevant to your chosen audience
- Place roadmaps in an accessible location and encourage stakeholders to familiarize themselves with the content
- Review content regularly to ensure roadmaps meet all stakeholder requirements
- Keep the roadmap current by updating it immediately after finalizing a change
- Ensure that roadmaps provide a comprehensive view by including short and long-term goals
From a technical perspective, follow these tips:
- Configure your project within Jira to include the epic issue type and set appropriate date fields. Otherwise, the roadmap won’t render.
- Jira roadmaps are limited to 300 epics, or 3,000 issues. Ensure that you’ve set due dates and close items once complete.
- You can resolve corruption issues that prevent roadmaps from displaying by ensuring you’ve correctly set the:
- Status
- Status category
- Issue type
- Rank settings
How to create roadmaps in Jira
If this is your first time creating a roadmap, be sure to connect Jira with Tempo’s Roadmunk before you begin. Once complete, create a central and customizable roadmap by following this guide.
Enable Jira roadmaps
- Log in to your Jira account.
- Select the project from the main dashboard.
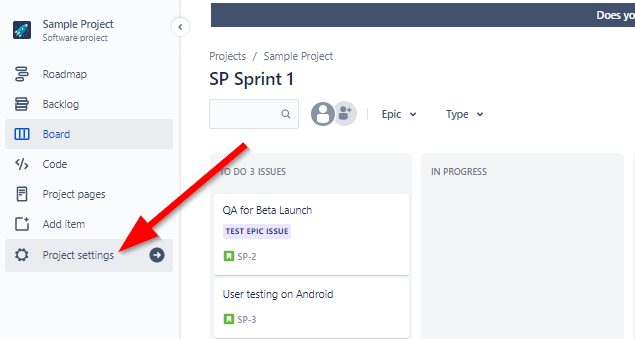
- Click Project Settings from the menu on the left side of the dash.
Source: Nira -
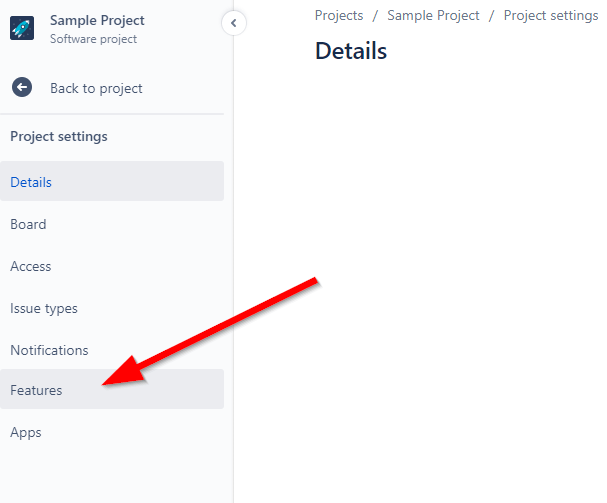
From Project Settings, click on Features in the left-side menu.
Source: Nira -
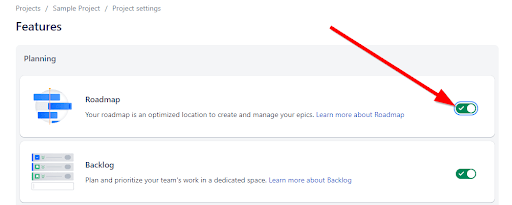
On this page, you’ll see a list of your account’s features. Click the toggle labeled Roadmaps to enable.
Source: Nira -
Return to the project dashboard by clicking Back to Project.
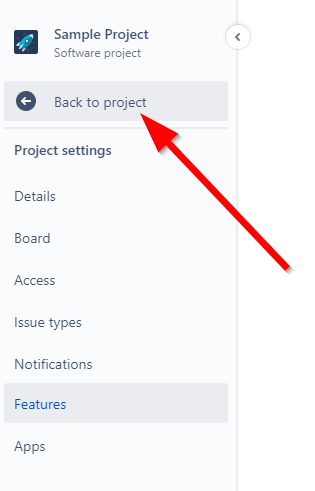
Source: Nira - Click Roadmap on the left side of the dashboard to access your project roadmap.
Create an epic roadmap in Jira
Now that you’ve enabled Jira roadmaps, it’s time to start plotting epics.
- Sign into Jira.
- Select the portfolio where you wish to house your epic.
- From the left-hand menu, click Roadmap under the portfolio’s name.
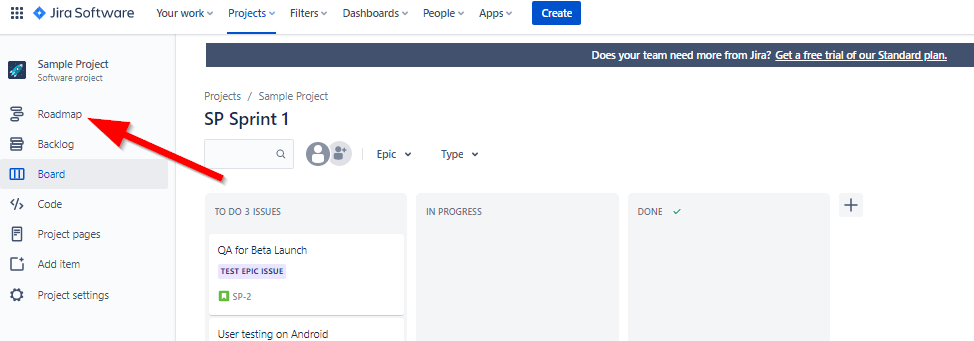
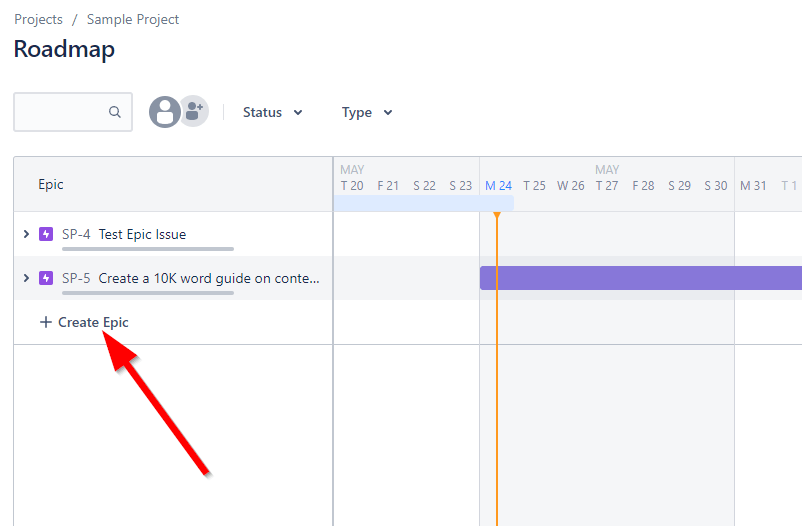
Source: Nira - Create a new epic by clicking + Create Epic.
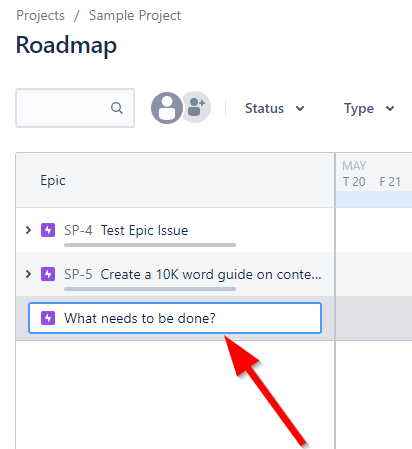
Source: Nira - Create a recognizable title for your epic, enter it into the new text box, and click Enter.
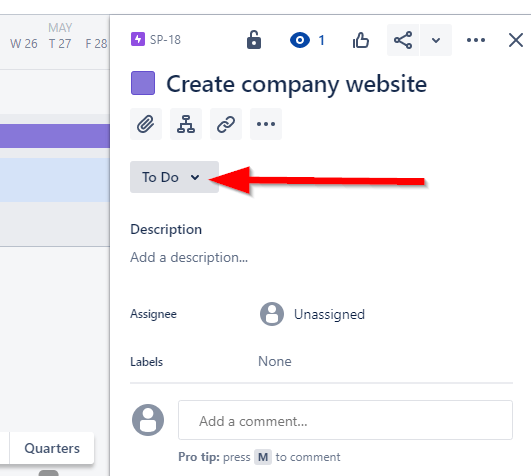
Source: Nira - Click on the new name to open the Settings panel on the right side of your screen with various options to define your epic.
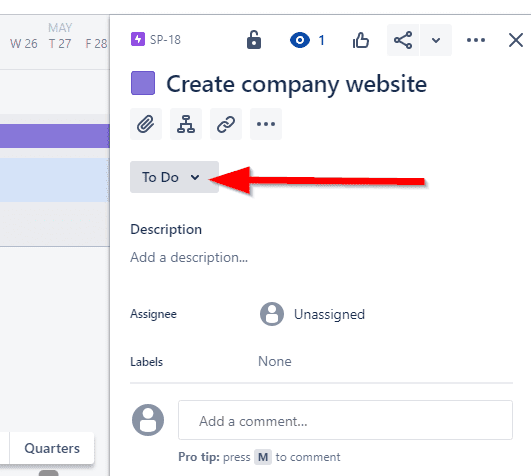
- Choose your workflow stage (To Do, In Progress, or Done) by clicking the dropdown in the Settings panel menu.
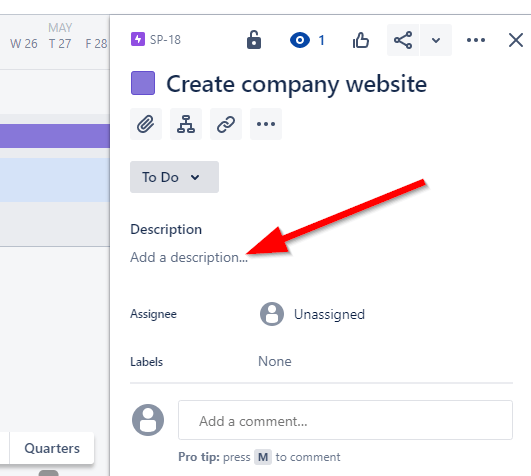
Source: Nira - Add a description to the Description textbox to introduce viewers to the epic’s long-term objective. Press Enter to save.
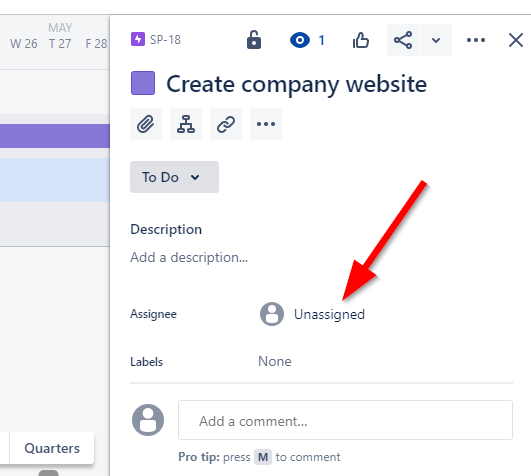
Source: Nira - Assign responsibility for the epic by clicking on the icon next to Assignee, then selecting the accountable team member’s name.
Source: Nira - To sort your epics based on certain criteria, add them by clicking Labels, entering the variable, and then clicking Enter to continue.
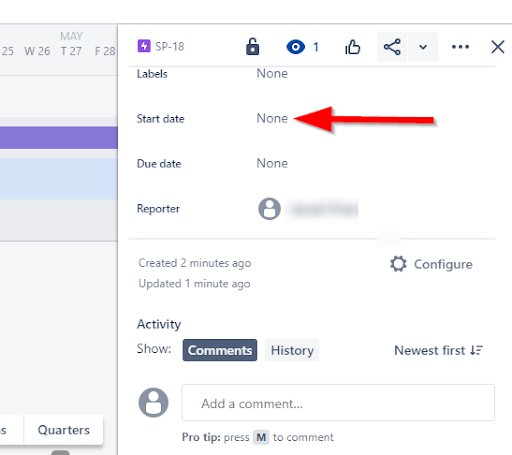
- Assign a start date by clicking None next to the words Start Date and selecting a date from the calendar. Pressing Enter or clicking outside the date field will submit the value. Your roadmap should now be visible in the dashboard
Source: Nira - Include a due date by clicking on None next to Due Date and repeating the same start date process.
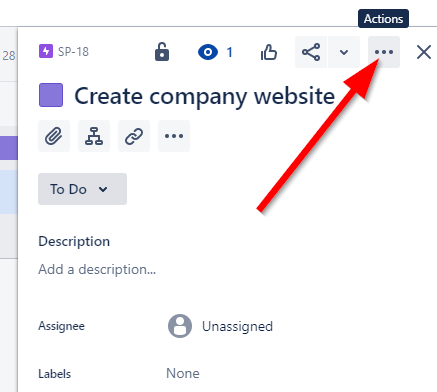
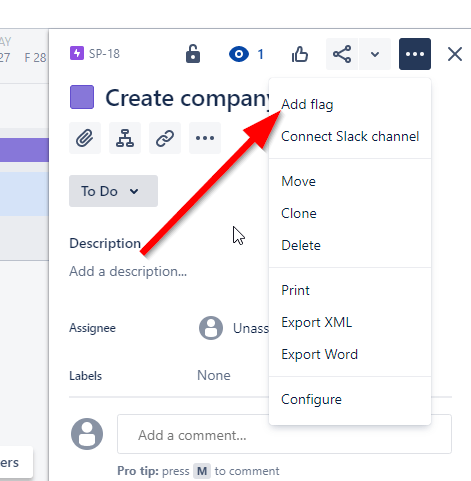
- You can create a filter by assigning a flag to urgent issues or tasks, clicking the Actions icon at the top right of the epic’s setting panel to do so.
Source: Nira - Click Add flag from the dropdown menu.
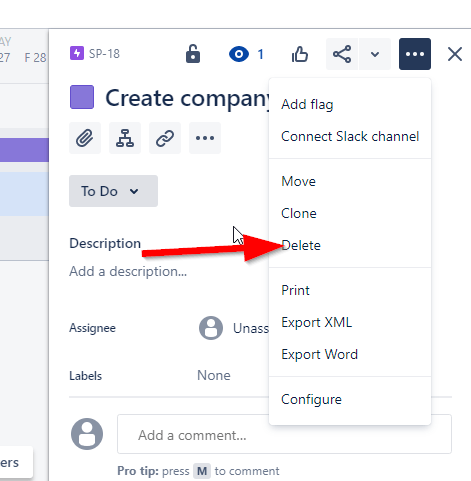
Source: Nira - You can also delete an epic by opening the Actions dropdown and selecting Delete.
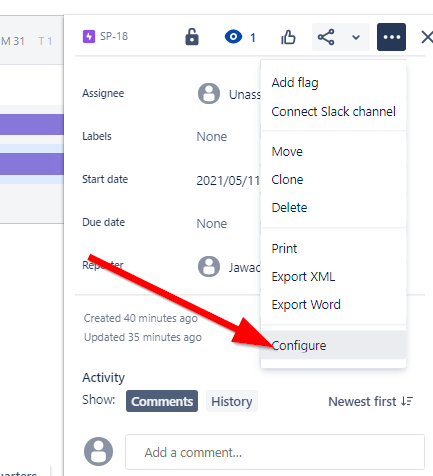
Source: Nira - Explore additional road-mapping options and add or remove fields by clicking Configure from the Actions menu in the Settings panel.
Source: Nira - To add a new field, drag a field type located to the right of the Context fields to the left side of the dashboard and label it with the content type.
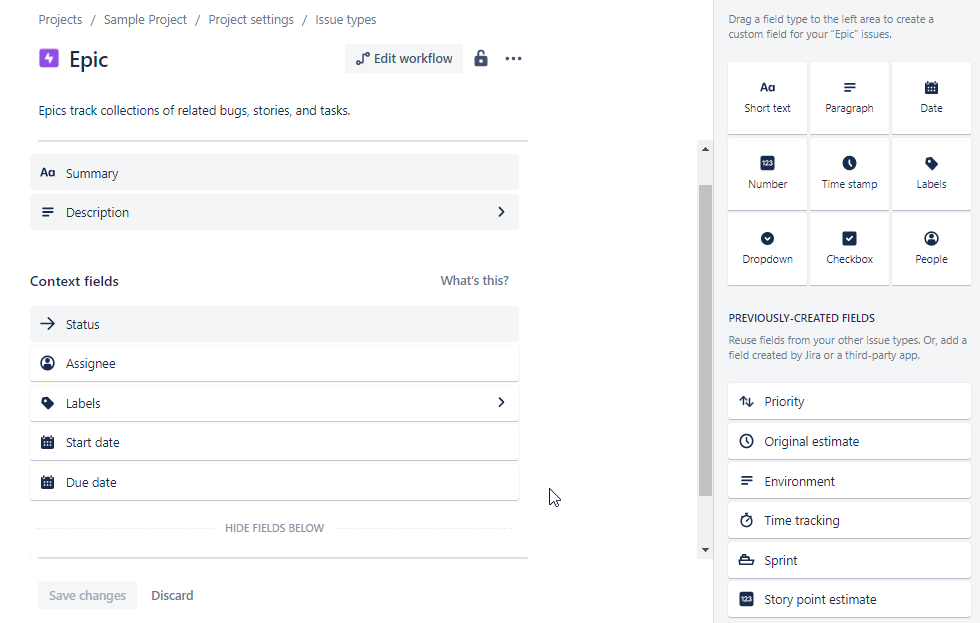
Source: Nira - Finally, click Save Changes to add the new field to your Settings panel.
Create a child issue
Congratulations, you’ve successfully created and configured your first epic. Now, break the epic’s long-term goals into sub-tasks or story points, which Jira Roadmaps refers to as child issues.
- Open Jira Roadmaps, then select the portfolio you’re working on. Hover your mouse over the epic you wish to populate with child issues.
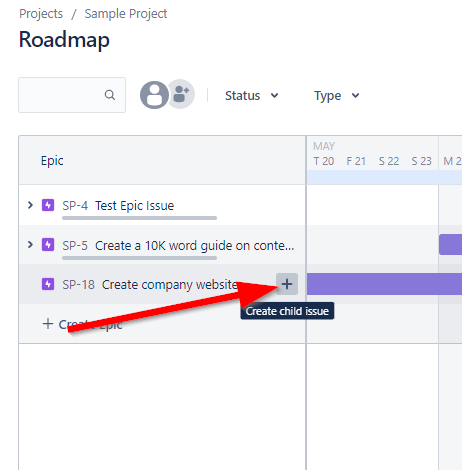
Source: Nira - Select the + icon to open the child issue field, then click on the What needs to be done? dropdown.
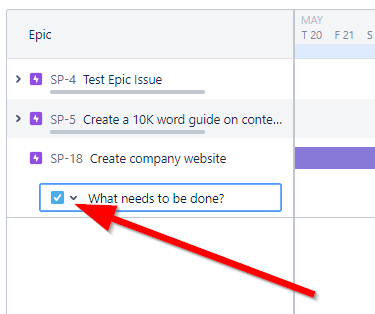
Source: Nira - Choose the issue type — Task, Bug, or Story.
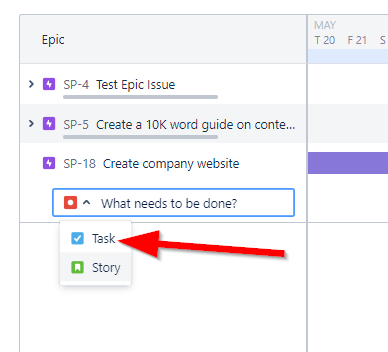
Source: Nira - Add a title to describe your child issue, then select Enter or click outside the field to add it to the epic.
- To configure, click the child issue title within the epic to open its Settings panel.
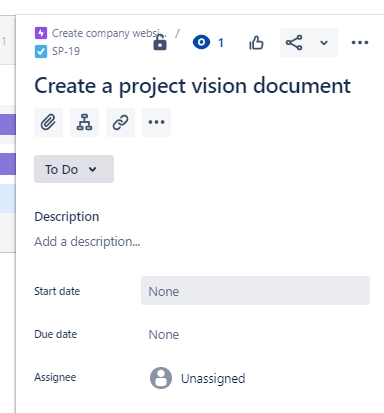
Source: Nira - The Settings panel is similar to the one you used during the epic’s creation. Add start and due dates by clicking on each field and selecting a date.
Source: Nira - Continue configuring the rest of the fields using the same methods used to configure the epic.
You should be able to see the child issue beneath its epic on the roadmap. Continue creating issues by following the same method. You can also drag and drop child issues into another epic in the roadmap interface.
Get started with Roadmunk for Jira
Start creating audience-friendly roadmaps with Jira-enabled Roadmunk to prioritize ideas, manage tasks, and track all your projects while building stakeholder alignment behind organizational goals. Then, connect your business’ high-level strategy with day-to-day planning by syncing your data seamlessly to provide visibility into every team activity.


